Eternal Holy City Okhema in Honkai: Star Rail is the initial area players unlock upon arriving in Amphoreus. The map consists of two distinct sections: Kephale Plaza and Marmoreal Palace.
Following Black Swan's advice in Penacony, the current Trailblaze Mission guides players to this new planet. The journey takes an unexpected turn when the train compartment comes under attack, stranding the team in an unfamiliar location. Fortunately, Phainon arrives to provide assistance, escorting everyone to the "Eternal Holy City" Okhema and introducing key figures within Amphoreus.
Eternal Holy City Okhema Treasure Locations In Honkai: Star Rail
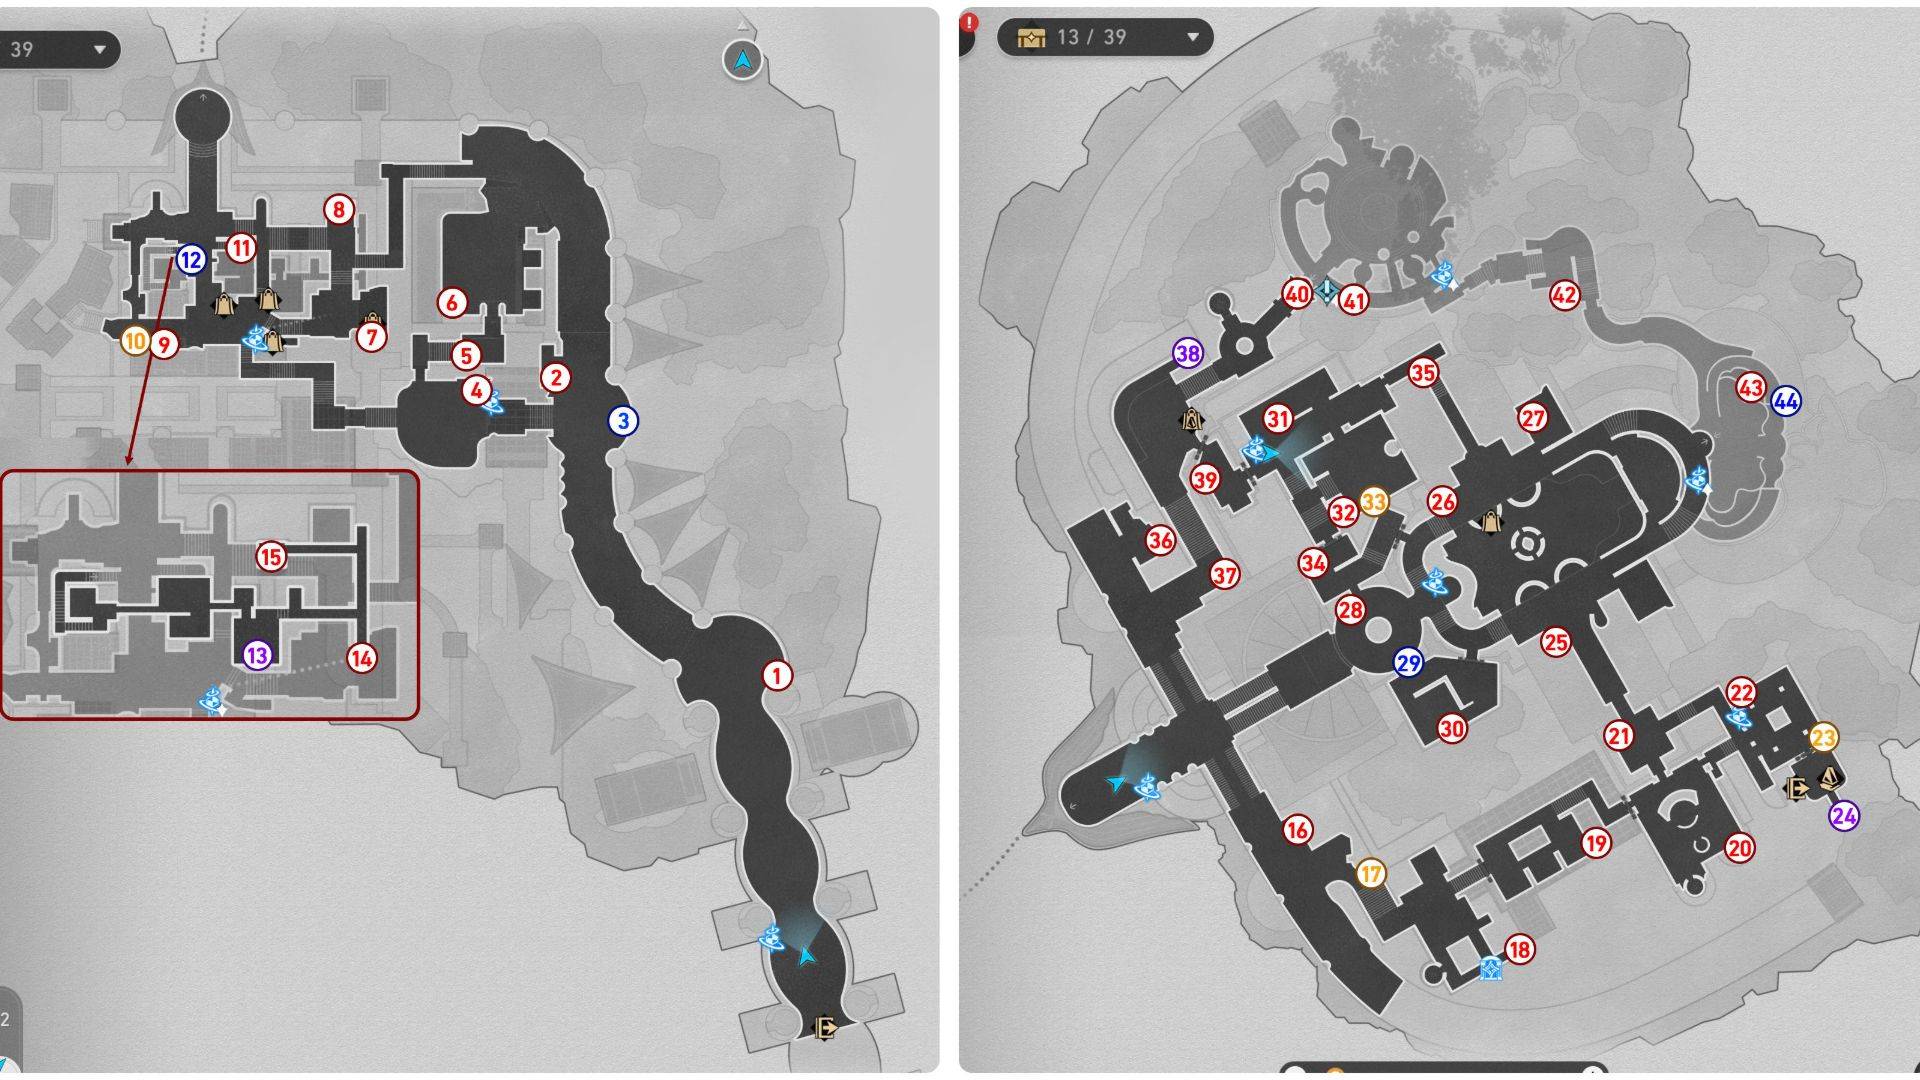
Okhema contains 33 Treasure Chests, 4 Flying Spears, 3 Spirithiefs, and 4 Golden Scapegoats in Honkai: Star Rail. Bringing ‘The Herta’ is highly recommended for exploration, as her Technique reveals uncollected chest locations on your map. Topaz also proves useful; her companion Numby alerts players whenever a chest is nearby and directs them to its position.
Blue markers indicate Golden Short Spears, purple markers show Spirithiefs, and yellow markers highlight Golden Scapegoat locations.
- 1. Begin at the Path of Parting Space Anchor, proceed north to the open area, and check the eastern side for a treasure chest.
- 2. Continue along the path toward Kephale Plaza. As the Space Anchor becomes visible, walk past it and look east. The chest is located close to the resting spot.
- 3. From the previous location, face southeast toward the breakable shield with an embedded spear. Reverse time and track the Golden Short Spear until it generates a treasure chest.
- 4. Fast travel to the Kephale Plaza Space Anchor, where you'll find a chest right beside it.
- 5. Walk north through the narrow corridor to spot a Basic Treasure near some crates.
- 6. Proceed further down the hallway into a plaza. Look west to find a chest next to a dinosaur statue.
- 7. Use the Marmoreal Market Space Anchor and head east to locate a chest inside Chartonus Smithy, the blacksmith shop.
- 8. Continue northward, where a Basic Treasure awaits at the road's end.
- 9. Return to the Marmoreal Market Space Anchor and travel west until you see two breakable shields. Destroy them to reveal the chest behind.
- 10. Adjacent to the previous chest lies the new Golden Scapegoat puzzle. Solve it by guiding the golden goat to illuminate the altar and unlock the reward.
- 11. Go back to the market's center and walk north to find small steps on both left and right sides. Climb the right steps first to claim a Basic Treasure.
- 12. Descend the stairs and move to the opposite side to discover a breakable shield with a spear. Break the shield, repair the Golden Short Spear, then follow it upward to the second floor.
- 13. The flying spear will halt near a ritual fountain. From there, head east onto the rooftop. Follow the path along the edge until you spot a chest. Upon claiming it, a Spirithief will steal your prize. Use Oronyx's power to rewind the fissures and force the Spirithief to return your treasure.
- 14. The next chest is visible at the southern end of the path.
- 15. After collecting the previous chest, head northwest for the final rooftop treasure.
- 16. Use the Marmoreal Palace Space Anchor and move southeast toward Dromas Stop by the roadside. The chest is hidden behind a breakable shield.
- 17. Proceed to the eastern staircase to encounter another Golden Scapegoat puzzle. Complete it for an additional Basic Treasure.
- 18. Continue upward along the path to a small bathing area. The chest rests in a corner near a lounge chair.
- 19. Walk northeast into a room packed with scrolls. The treasure chest sits near the final cabinet.
- 20. Keep heading northeast to another bathing area. The chest is positioned beside a long table.
- 21. Look toward the northern doorway to find a Basic Treasure inside a room with a bard and an audience.
- 22. Warp to the Hall of Respite Space Anchor and turn around to see a chest right next to the anchor.
- 23. Cross to the room's opposite side and solve the Golden Scapegoat puzzle to unlock the treasure.
- 24. Enter your private chamber adjacent to the previous puzzle and walk to the balcony's end to discover a Spirithief's treasure chest.
- 25. Head to the Overflowing Bath Space Anchor, walk to the southern section of the bathroom, and retrieve the chest submerged in water.
- 26. Now go to the room's opposite side, where another chest also lies underwater.
- 27. From this location, walk northeast to a swimming pool containing a Dromas. The chest is in the water beside the creature.
- 28. Return to the Overflowing Bath Space Anchor and pass through the waterfall to reach the reception area. A chest is visible next to a chair.
- 29. Move to the room's opposite side and destroy the breakable shield. Repair the Golden Short Spear and track it to claim a chest.
- 30. While pursuing the flying spear, you'll enter a back room containing a chest on a crate. Be sure to collect it before continuing to follow the spear.
- 31. Use the Court of Seasons Space Anchor to spot a chest against the wall.
- 32. Proceed to the southern massage room, where a Basic Treasure sits near the beds.
- 33. A Golden Scapegoat puzzle is located in the same room as the previous chest. Solve it to reveal the hidden treasure.
- 34. Exit the massage room and walk south to find a chest inside a storage area.
- 35. Return to the Court of Seasons Space Anchor one final time and head northeast down the corridor for another chest.
- 36. Now, travel to the Marmoreal Palace Space Anchor and go north toward the crate storage zone. The chest is positioned near a dinosaur.
- 37. Continue upward to find the next chest close to a group of NPCs.
- 38. Follow the path leading to a banquet and go left of the staircase. The chest rests on a partition beside a cushion.
- 39. From this spot, enter the southern room and retrieve the chest concealed behind a breakable shield.
- 40. Leave the room and approach the northern elevator, but don't activate it yet. Instead, check behind the elevator for another hidden chest.
- 41. Ride the elevator to the second floor and head east toward the Basic Treasure near the Flying Amphora in front of the cabinet.
- 42. Continue along the path to the Garden of Life Space Anchor, then proceed east into a small private room to locate another chest.
- 43. Teleport to the Hero’s Bath Space Anchor and go to the northern pool for a chest submerged in water.
- 44. Finally, use the swirling pillar to ascend, where you'll discover a breakable shield with a flying spear. Repair the Golden Short Spear and follow its path to unlock Okhema's final treasure chest.
Gathering treasure chests remains one of the most effective ways to obtain Stellar Jades in Honkai: Star Rail. With the new area introduced in version 3.0, Trailblazers can accumulate substantial Jades by thoroughly exploring all chests and puzzles throughout Amphoreus.