In *Tower Blitz*, you begin with a single type of tower, but as you progress, you unlock a variety of towers, each with unique strengths and weaknesses. To help you craft the best strategy tailored to your play style, here's a comprehensive tier list of all the towers in *Tower Blitz*.
All Towers In Tower Blitz Ranked
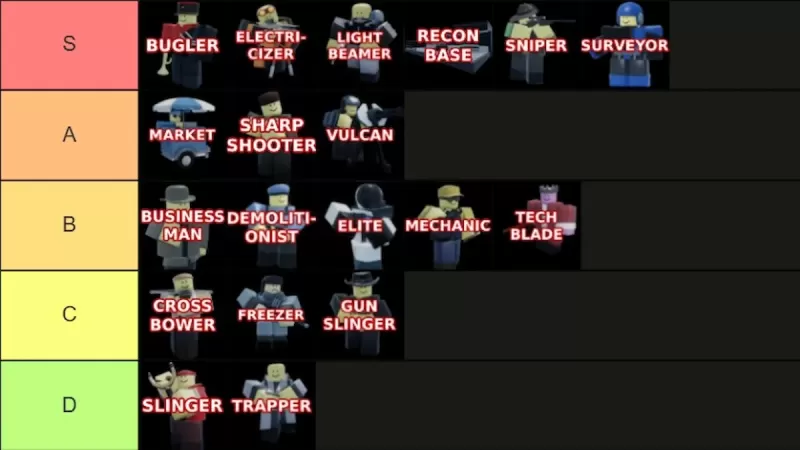 Image by The Escapist. We've meticulously ranked all the in-game towers from S-Tier to D-Tier, considering their abilities, upgrade paths, cost, and overall efficiency. **S-Tier** towers are the cream of the crop, nearly guaranteeing a win on any map when used effectively. **A-Tier** towers are solid but have certain limitations that set them apart from the top-tier. **B-Tier** towers are average, neither exceptional nor terrible. **C-Tier** towers are generally underwhelming, though they may have some niche uses. **D-Tier** towers are the least effective, offering little to no value in most scenarios. Below, we'll delve into the specifics of each ranking.
S-Tier Towers
| Tower | Cost | Explanation | Pros and Cons |
|---|---|---|---|
 | To unlock the tower: **2500 Tokens** (available at Level 25) To place in-game: **750 Cash** | This tower is overwhelmingly powerful. Despite being purely supportive, it's nearly essential for Expert mode. It enhances other towers significantly, though it can't boost Recon Bases. | + Boosts all other towers' performance significantly + Essential for Expert mode – Exclusively a support tower |
 | To unlock the tower: **5500 Tokens** To place in-game: **3800 Cash** | Ideal for players who appreciate the power of a Sniper but crave something more intense. With the largest range and damage in the game, it excels when placed near the end of the map to obliterate approaching enemies. | + Exceptional power and range + Combines support and damage capabilities – High cost |
 | To unlock the tower: **Complete the contract** To place in-game: **1800 Cash** | Similar to Electricizer, Lightbeamer stands out as one of the game's strongest towers. Strategically placed to face a straight path, its death ray can decimate foes. Both upgrade paths are exceptional, making it a game-changer when positioned correctly. | + Remarkably powerful + Excellent for crowd control – Not viable in early game – Expensive |
 | To unlock the tower: **8000 Tokens** (available at Level 45) To place in-game: **1000 Cash** | This tower offers incredible value, spawning multiple units that fight alongside you. As you upgrade, these units grow stronger. Both upgrade paths are formidable, making Recon Base a key to success on higher difficulties, despite its steep upgrade costs. | + Continuously spawns units + Both paths are overpowered + Ideal for Expert mode – Very expensive upgrades |
 | To unlock the tower: **1500 Tokens** To place in-game: **500 Cash** | Undoubtedly the best early-game tower, Sniper is versatile enough to remain useful throughout the game, particularly in Expert mode. Its high piercing damage makes it a staple choice. | + Top early-game tower + Usable throughout the game + High piercing damage – Slightly slow |
 | To unlock the tower: **Complete the contract** To place in-game: **700 Cash** | Surveyor's versatility allows it to serve as both a support and damage tower, depending on the upgrade path chosen. It's a crucial asset from the beginning to the end of a round. | + Highly versatile + Usable from start to finish – Limited to four placements |
A-Tier Towers
| Tower | Cost | Explanation | Pros and Cons |
|---|---|---|---|
 | To unlock the tower: **1000 Tokens** To place in-game: **650 Cash** | A valuable tower if mastered correctly. The bottom path can be misleading, as it may lead to financial loss. Focus on the top path for steady income generation, which is crucial in multiplayer games. | + Vital in all games, particularly multiplayer + Generates profit – Less effective bottom path – Slow initial money generation |
 | To unlock the tower: **1300 Tokens** To place in-game: **600 Cash** | An excellent early-game option that efficiently deals with enemy groups. Its broad range covers early needs, though its piercing damage is modest. Ideal for beginners transitioning into mid-game. | + Effective crowd control and damage + Suitable for beginners – Ineffective in Expert mode – Low defense piercing |
 | To unlock the tower: **3000 Tokens** To place in-game: **2500 Cash** | A solid choice for mid to late-game. Opt for the bottom path to maximize its strength, which can reach 140 DPS and full defense piercing at max level. Its initial damage might disappoint, but patience pays off. | + Highly effective + Versatile – Slow to reach full strength – No flying detection |
B-Tier Towers
| Tower | Cost | Explanation | Pros and Cons |
|---|---|---|---|
 | To unlock the tower: **Complete the contract** To place in-game: **800 Cash** | This tower aids in money farming and damage dealing, complementing Recon Base. However, Market offers better financial returns, and other towers provide more potent damage options. | + Dual functionality for money and damage + Adequate for early game – Easily replaced by superior options |
 | To unlock the tower: **3500 Tokens** To place in-game: **900 Cash** | Effective for early-game crowd control with high piercing damage. However, its utility wanes as better options emerge later in the game. It also lacks flying detection. | + Strong crowd control and piercing damage – Becomes obsolete post-early game – No flying detection |
 | To unlock the tower: **Complete the contract** To place in-game: **1200 Cash** | Similar to Vulcan but less versatile. The bottom path maximizes its potential, but its long cooldown requires strategic use. | + Effective bottom path – Long cooldown – Expensive |
 | To unlock the tower: **Complete the contract** To place in-game: **480 Cash** | Useful in mid-game with a variety of turrets, though only the Tesla turrets make a significant impact. Despite its strategic value, it's cost-inefficient. | + Effective in mid-game – Cost-inefficient |
 | To unlock the tower: **Free** (available at Level 10) To place in-game: **400 Cash** | A melee tower adept at handling early-game groups and tanks. Its effectiveness is hampered by its short range and slow speed, which are critical drawbacks for a melee unit. | + Effective crowd control + Efficient in early game – Limited range – Slow |
C-Tier Towers
| Tower | Cost | Explanation | Pros and Cons |
|---|---|---|---|
 | To unlock the tower: **200 Tokens** To place in-game: **400 Cash** | A decent choice for beginners or as an early-game alternative to Slinger. Its long range and group handling are its strengths, but its damage remains disappointingly low even after upgrades. | + Affordable, suitable for beginners + Long range – Becomes obsolete post-early game – Low damage |
 | To unlock the tower: **450 Tokens** To place in-game: **400 Cash** | When paired with high-DPS towers, Freezer can be useful. However, by the time you can afford such combinations, better options are available. It's effective against fast enemies but becomes useless once they gain freeze immunity. | + Effective against fast enemies – Obsolete post-early game – Limited enemy types it can handle |
 | To unlock the tower: **500 Tokens** To place in-game: **400 Cash** | Another melee tower that struggles with speed and range. The top path can extend its range, but at the cost of further reducing its already low damage. It's only viable in Normal mode. | + Decent top path – Limited range – Ineffective in Hard or Expert modes |
D-Tier Towers
| Tower | Cost | Explanation | Pros and Cons |
|---|---|---|---|
 | To unlock the tower: **Free** To place in-game: **200 Cash** | Designed as a starter tower for new players, Slinger is best used in the first wave and discarded as soon as possible due to its poor damage and slow firing rate. | + Free – Extremely low damage and firing speed, even at max level – Useless after the first few waves |
 | To unlock the tower: **1000 Tokens** (available at Level 10) To place in-game: **500 Cash** | Despite its cost and level requirement, Trapper struggles to defeat even the weakest enemies. There's no justification for using it when cheaper, more effective towers are available. | + Somewhat decent bottom path – Not cost-efficient – Often nearly unusable – Struggles throughout the game |
With this detailed tier list of all the towers in *Tower Blitz*, you're now equipped to devise the best strategy for your play style. If you're looking for a boost to get started, our *Tower Blitz* codes can give you the edge you need.